分支操作实战
创建分支test
1
2
| $ git checkout -b test
Switched to a new branch 'test'
|

在test分支添加test.txt文件
1
2
3
4
5
6
| $ echo "" >> test.txt
$ git add test.txt
$ git commit -m 'add test.txt'
[test 093885d] add test.txt
1 file changed, 1 insertion(+)
create mode 100644 test.txt
|

推送test分支到upstream
1
2
3
4
5
6
7
8
9
10
11
12
| $ git push origin test
Counting objects: 3, done.
Delta compression using up to 4 threads.
Compressing objects: 100% (2/2), done.
Writing objects: 100% (3/3), 274 bytes | 0 bytes/s, done.
Total 3 (delta 0), reused 0 (delta 0)
remote:
remote: Create merge request for test:
remote: http://ubuntu/shuwei/learngit/merge_requests/new?merge_request%5Bsource_branch%5D=test
remote:
To git@10.211.55.9:shuwei/learngit.git
* [new branch] test -> test
|

再次修改test分支test.txt文件
1
2
3
4
5
| $ echo "a" >> test.txt
$ git add test.txt
$ git commit -m 'mod test.txt'
[test a44ba6a] mod test.txt
1 file changed, 1 insertion(+)
|

将修改推送到upstream
1
2
3
4
5
6
7
8
9
10
11
12
| $ git push origin test
Counting objects: 3, done.
Delta compression using up to 4 threads.
Compressing objects: 100% (2/2), done.
Writing objects: 100% (3/3), 274 bytes | 0 bytes/s, done.
Total 3 (delta 0), reused 0 (delta 0)
remote:
remote: Create merge request for test:
remote: http://ubuntu/shuwei/learngit/merge_requests/new?merge_request%5Bsource_branch%5D=test
remote:
To git@10.211.55.9:shuwei/learngit.git
093885d..a44ba6a test -> test
|

切换到master分支
1
2
3
| $ git checkout master
Switched to branch 'master'
Your branch is up-to-date with 'origin/master'.
|

合并test分支到master
1
2
3
4
5
6
| $ git merge test
Updating f25f3a7..a44ba6a
Fast-forward
test.txt | 2 ++
1 file changed, 2 insertions(+)
create mode 100644 test.txt
|

合并分支时,加上--no-ff参数就可以用普通模式合并,合并后的历史有分支,能看出来曾经做过合并,而fast forward合并就看不出来曾经做过合并。
推送master到upstream
1
2
3
4
| $ git push origin master
Total 0 (delta 0), reused 0 (delta 0)
To git@10.211.55.9:shuwei/learngit.git
f25f3a7..a44ba6a master -> master
|

删除本地test分支和upstream test分支
1
2
3
4
5
6
| $ git push origin --delete test
To git@10.211.55.9:shuwei/learngit.git
- [deleted] test
$ git branch -d test
Deleted branch test (was a44ba6a).
|

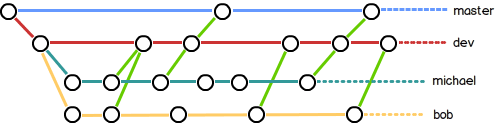
配合上图就能更明了的看清楚本地与upstream的分支变化。
类似这个时间线的截图工具是GitUp
代码冲突
如果在test分支修改过程中,master分支也对同一文件进行了修改,可能就会出现代码冲突,这种情况下就需要手动进行代码合并了,合并完成后再提交。
冲突情况大部分都是对同一文件的修改,格式大致如下:
1
2
3
4
5
| <<<<<<< HEAD
aaaa
=======
bbb
>>>>>>> test
|
那就需要人手动修改冲突文件并决定哪些要留哪些不需要。
分支策略(理想情况)
在实际开发中,我们应该按照几个基本原则进行分支管理:
首先,master分支应该是非常稳定的,也就是仅用来发布新版本,平时不能在上面干活;
那在哪干活呢?干活都在dev分支上,也就是说,dev分支是不稳定的,到某个时候,比如1.0版本发布时,再把dev分支合并到master上,在master分支发布1.0版本;
你和你的小伙伴们每个人都在dev分支上干活,每个人都有自己的分支,时不时地往dev分支上合并就可以了。
所以,团队合作的分支看起来就像这样:
但实际上…
拣选合并(cherry-picking):
1
2
3
4
| $ git checkout master
$ git cherry-pick 321d76f
or
$ git cherry-pick -n 321d76f 32sd76d
|
拣选合并用于在非master分支中选择需要的commit id来进行合并,可能会有一定的冲突,解决就好。